Step 1 - Navigate to Zip Code Groups and Add New Zip Code Group
A - Click on Data link
B - Click on Other Tab
C - Click on Zip Code Groups
D - Click on Add New

Step 2 - Name Zip Code Group
A - Enter a Name for the Zip Code Group
B - Enter a Description (Optional)
C - Click OK to save

Step 3 - Configure Zip Code Group
Highlight the zip code group you want to configure, and then click the 'Zip Codes' tab
A - Use the drop down Select States and checkmark the state or states the zip code group is in.
B - Highlight the Zip Codes to include in the group. Click, Control+Click or Shift+Click, to select the zip codes to include in that group.
Tip: Column headers (Zip, City, County, etc.) are clickable to sort ascending or descending. This is especially helpful to ensure all zip codes are included for a particular county/city.
C - When the desired zip codes are selected, click Add Selected.
D - To remove one or more zip codes from the group, highlight the zip codes (Control+Click or Shift+Click for multiple) and click Remove Selected.
E - Once an initial set of zip codes have been added, click the Display All checkbox to show all zip codes for the state on the map.
- Zip Codes in your group will display on the map in black.
- Zip Codes you have selected, but not yet added to your zip code group will display on the map in blue.
- Zip Codes you have added to your group and selected to be removed, will display on the map in red.
- Zip Codes not selected and not added to your group will display on the map in green.
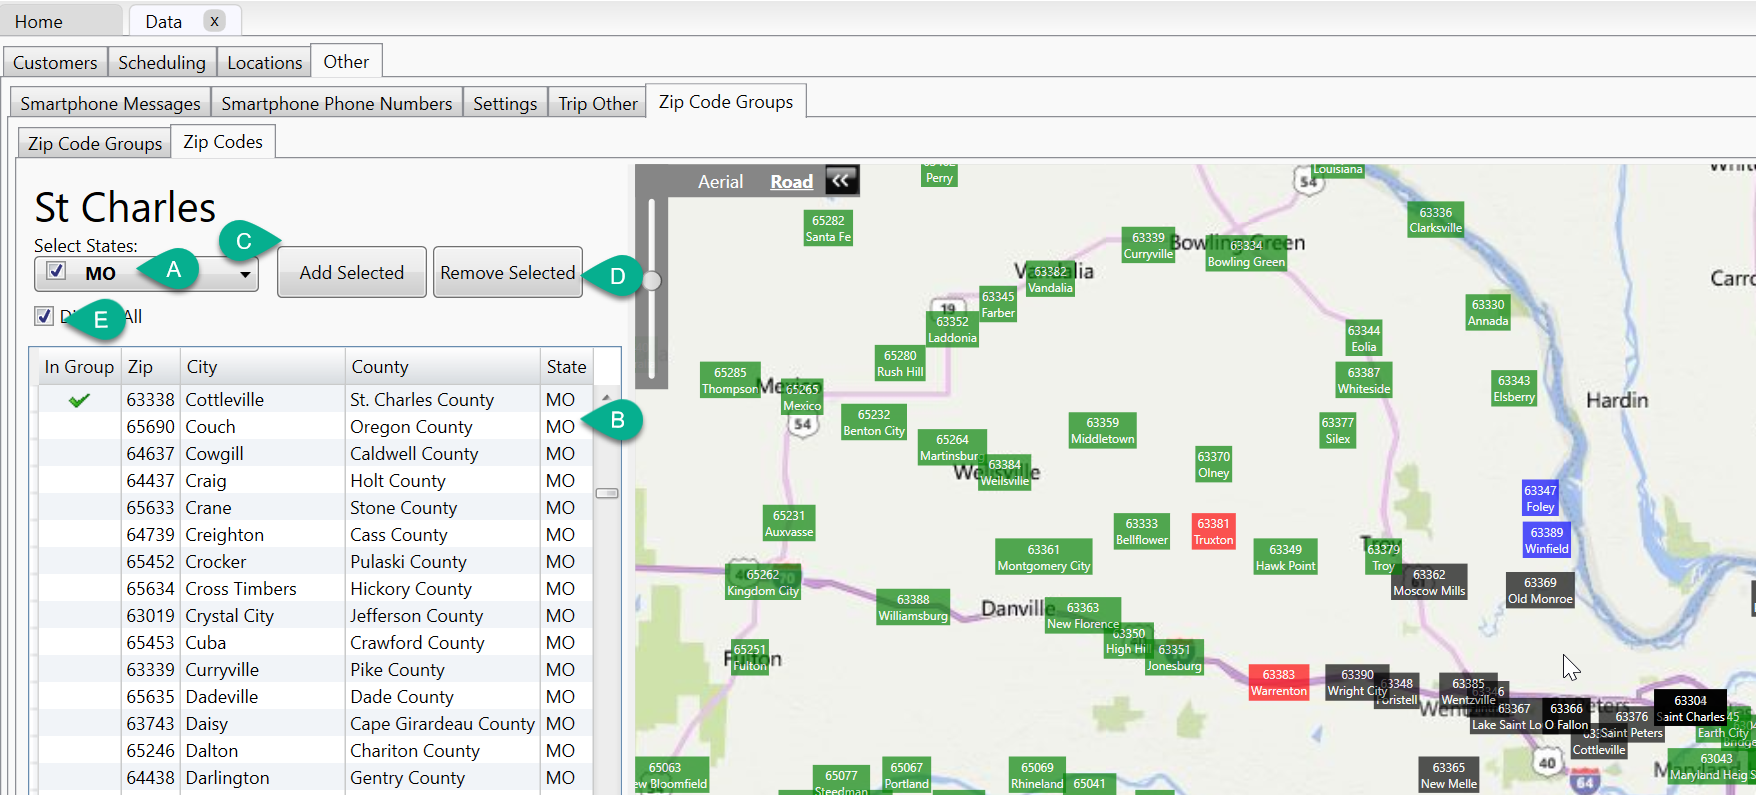
- You can click on the zip codes on the map to add and remove them from your group.
How to Use Zip Code Groups
Zip code groups are typically used during the batch scheduling process to help organize trips and assign them to the most appropriate runs.
Filter Trips by Zip Code Group
- Navigate to the Schedules tab
- Select the Trips sub-tab
- Choose the date you are scheduling for

- Click the blue funnel (Filter icon)

- Check boxes as needed to filter by zip code group

- Click the back arrow to apply the filter

How This Helps
Using zip code groups in filters allows you to:
- View trips within a specific geographic area
- Group similar trips together for scheduling
- More easily assign trips to the appropriate runs
Tip: For more information on how to batch schedule trips, including where and when to filter by your zip code groups, please reference our guide linked below.
How Do I Schedule Trips in Bulk Using Batch Scheduling in MediRoutes?
Still need help? Contact MediRoutes Support.