Dispatch Views in MediRoutes Desktop
Dispatchers rely on three primary views within MediRoutes Desktop to manage daily operations. Each view provides a different level of visibility — from high-level route oversight to real-time run management.
1. Dispatch Main
The Dispatch Main screen is divided into two sections:
-
Right Side: Displays all scheduled runs for the selected date. This section includes key status indicators to help you quickly assess run progress and driver activity.
-
Left Side: Displays all unscheduled trips that still need to be assigned to a run.
This view is most commonly used for assigning trips and monitoring run status throughout the day.
2. Dispatch Overview
The Dispatch Overview screen provides a full-day snapshot of your operations. It is divided into two sections:
-
Map Overview: A visual map displaying routes and trip locations.
-
All Events Tab: A comprehensive list of all trip events for the day.
This view is ideal for high-level monitoring and quickly identifying delays, overlaps, or operational issues.
3. Run (Route) View
The Run (Route) View displays details for an individual run. The layout is similar to the Scheduling screen, with additional real-time functionality.
As drivers complete trip events in the Mobile App, this screen updates immediately — allowing dispatchers to monitor progress and respond quickly to changes.
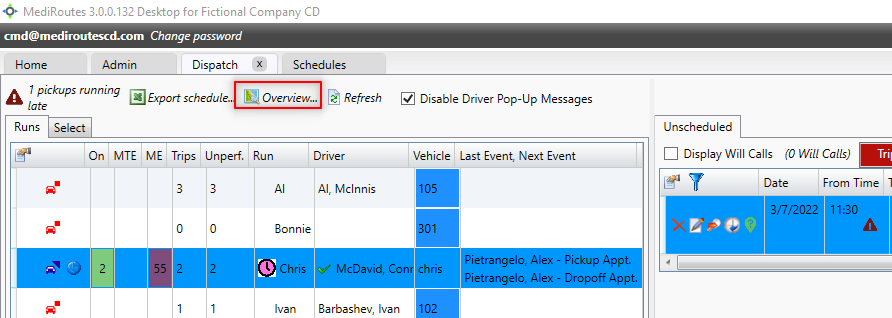
Dispatch Main
To get to the dispatch screen, click on the dispatch link at the top of MediRoutes:

The first screen that loads is the dispatch main screen. This screen is split into two sections. On the right side of the screen is all of your runs for the day and the left side is all of your unscheduled trips. The right side has some basic information regarding the status of your runs:
ON - Indicates how many passengers are currently onboard the vehicle
MTE (Minutes to Empty) - How many minutes until the vehicle will be empty. Can be used to quickly identify which run will be free in the near future.
ME ( Minutes Empty) - Once the vehicle becomes empty, indicates how many minutes the vehicle will be empty.
Trips - Total number of trips scheduled for the day
Unperf - Total number of trips scheduled for the day that have not yet been performed.
Run - Name of the Run
Driver - Driver Assigned to the Run
Vehicle - Vehicle Assigned to the Run
Last Event/Next Event - Shows what the last event the driver completed is and the next event the driver will be completing.

To the right of the runs, you will see an icon that looks like a car. This icon can be Blue, indicating that the vehicle has started their day, or red, indicating that the vehicle has either not started its day or is completed for the day. Clicking on this icon will take you to the vehicles schedule.
Unscheduled
The unscheduled list shows all unscheduled trips for the day. You can shop these trips just like in the shopping screen, but with on difference. On the dispatch screen, the only runs that will show as options will be those that are currently on the road, having completed their pull-out event for the day.
A red triangle icon will show on any trip that is identified as 'late' meaning that the current time is after the defined pickup time for the customer.
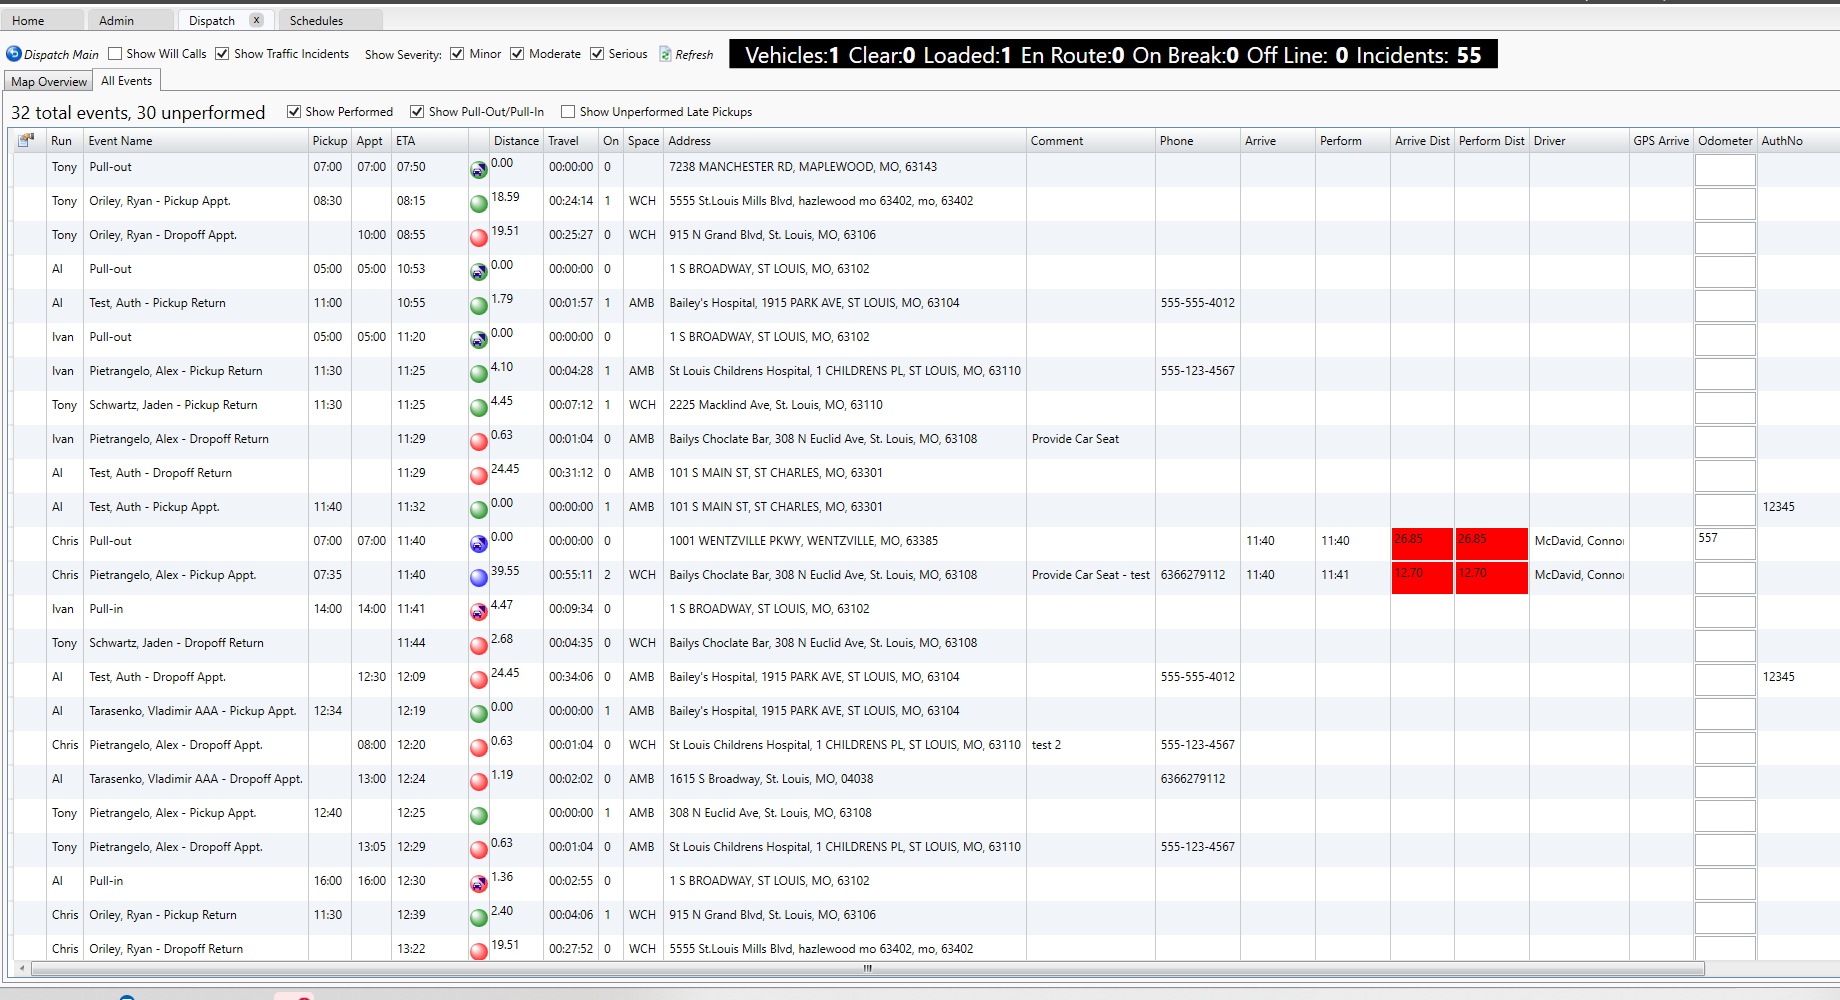
Dispatch Overview
To reach the dispatch overview screen, click on the Overview Icon within the Dispatch Main Screen
Map Overview
The Map Overview shows the location of all of your vehicles currently logged into the Mobile App. Your vehicles will represented by a blue circular icon with a highlight around it. Depending on the color of the highlight, the screen indicates what the status of that vehicle is.
Green (Clear) - Indicates that the route is clear without any passengers on board and with no trips needing to be picked up for at least a half an hour.
Yellow (Loaded) - Indicates that the route currently has passengers on board
Purple (EnRoute) - Indicates that the route is on its way to pick up a passenger.
Red (Offline) - A red icon indicates the last known location for a route that is offline.
The Map overview can also show you where traffic incidents are in areas where your vehicles will be traveling, by clicking on the checkbox to 'Show Traffic Incidents.' Once this is checked, you can use the additional checkmarks at the top of the screen to show or hide certain severities of incidents, so that you can filter out the traffic incidents to hide those that may not impact you.

All Events Tab
The All Events Tab shows all trips scheduled across all of your routes for the day. You can sort this screen by clicking on any of the headers, but it is recommended that you use the default sort of ETA.
You have options to hide or show the performed trips, and it is also recommended that you do uncheck the 'Show Performed' box at the top to hide any of the performed trips. By doing this, the screen shows only the trips that have not been completed by your drivers. At the end of the day, this screen should show that there are 0 unperformed trips, indicating that your drivers have completed all of the events that have been scheduled to them.
If a trip that should be completed has not been, you can click on the Run name on the left of the screen to be taken directly to that run, so that you can review it and see where the driver currently is on their schedule.
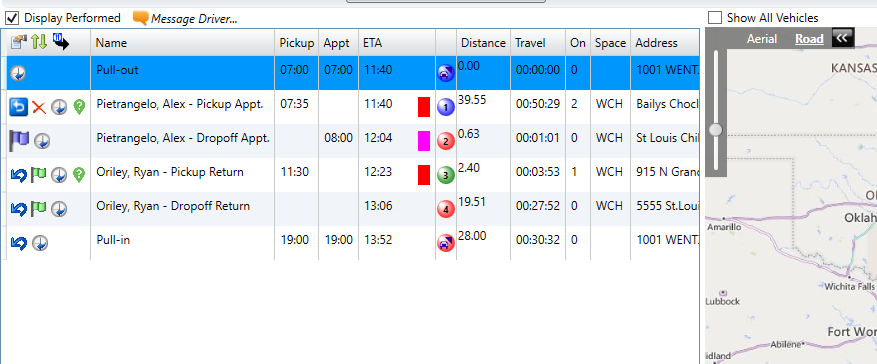
Run (Route) View
The icons to the right of the events will indicate if the event has been completed.
A green flag indicates that the event has not yet been completed by the driver
A blue flag indicates that the event has been arrived, but not yet performed
The blue box/red x icon indicates that the event has been completed by the driver. Anything in this status will also show that the green/red number indicating the event sequence of the trip has turned blue, also indicating the event has been performed.
It is not recommended that a dispatcher perform the events on behalf of the drivers, however they can do so by clicking on these flags. Clicking on the green flag will mark a trip as arrived, clicking on the blue flag will mark the trip as performed. The red X will mark the trip as a no show/cancel at door, and the blue box will undo the perform actions of the driver and return the trip to an unperformed status.