Batch Scheduling
A guide on how to run the Batch Scheduling tool in MediRoutes Desktop
Step 1 - Navigate to Batch Scheduling
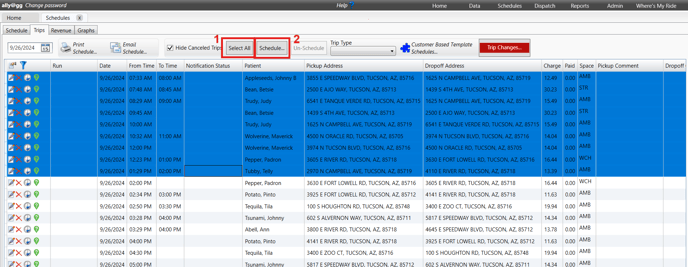
Open the Schedules tab, then click the Trips tab.

Note: The Schedules tab will always load tomorrow's date by default. If you are scheduling further out, please make sure to change the date in the top left corner before proceeding to schedule.
Step 2 - Select the Trips to Schedule
You can either use the (1)Select All button at the top to select all of the trips or you can select a group of individual trips by using Shift + Mouse Click. Once you have selected the trips you want to schedule, click on the (2)Schedule button right next to Select All.

Step 3 - Select the Runs and Schedule
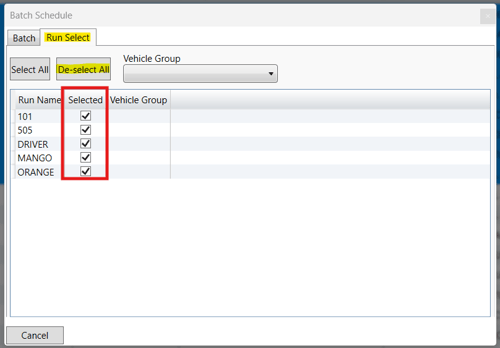
In the Batch Schedule window, click the tab that says Run Select, and uncheck any runs that you do not want to schedule trips to. You can also use the De-select All button to uncheck all runs and check only the ones you would like to schedule trips to.

Once you have defined which runs you want to schedule the trips to, click back over to the Batch tab and press the Schedule button.

Tip: The batch scheduling tool looks at the load and unload times on your Space Types as well as your MediRoutes system Violation Sets. Those values can be adjusted to optimize the batch scheduling tool. For further questions on this or for further assistance in setting those values, please contact MediRoutes Support.
Revised Date: 9/25/24 ARB
![MicrosoftTeams-image6f6e78ac5251452f5e9d5419521926001b2457277276701c3aff0c935893efe05f359183e579e81145254f68fa804b37b1631dcaf07986d136aeb8e94ed62bd3.png]](https://support.mediroutes.com/hs-fs/hubfs/MicrosoftTeams-image6f6e78ac5251452f5e9d5419521926001b2457277276701c3aff0c935893efe05f359183e579e81145254f68fa804b37b1631dcaf07986d136aeb8e94ed62bd3.png?height=50&name=MicrosoftTeams-image6f6e78ac5251452f5e9d5419521926001b2457277276701c3aff0c935893efe05f359183e579e81145254f68fa804b37b1631dcaf07986d136aeb8e94ed62bd3.png)