![MicrosoftTeams-image6f6e78ac5251452f5e9d5419521926001b2457277276701c3aff0c935893efe05f359183e579e81145254f68fa804b37b1631dcaf07986d136aeb8e94ed62bd3.png]](https://support.mediroutes.com/hs-fs/hubfs/MicrosoftTeams-image6f6e78ac5251452f5e9d5419521926001b2457277276701c3aff0c935893efe05f359183e579e81145254f68fa804b37b1631dcaf07986d136aeb8e94ed62bd3.png?height=50&name=MicrosoftTeams-image6f6e78ac5251452f5e9d5419521926001b2457277276701c3aff0c935893efe05f359183e579e81145254f68fa804b37b1631dcaf07986d136aeb8e94ed62bd3.png)
A Funding Source identifies who pays for a trip in MediRoutes.
Funding sources can include:
-
NEMT brokers (for example: ModivCare, MTM, Access2Care, Veyo, Verida)
-
Organizations or facilities (local hospitals, nursing homes, group homes)
-
Private pay clients
Each trip in MediRoutes is associated with a funding source so the system knows how trips are billed and reimbursed.
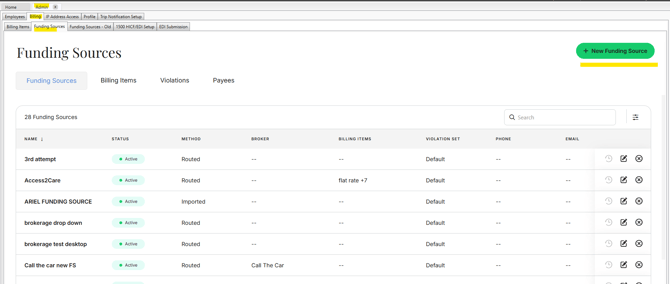
How to Create a Funding Source
Step 1: Navigate to Funding Sources
-
Go to Admin
-
Select the Billing tab
-
Click Funding Sources
-
Click Add New…
A new slide-out window will open.
Step 2: Enter Funding Source Details
-
Funding Source Name
Enter the name of the broker, facility, or payer.
NOTE: Funding Source Name must be unique and not already used in your system, active or inactive.
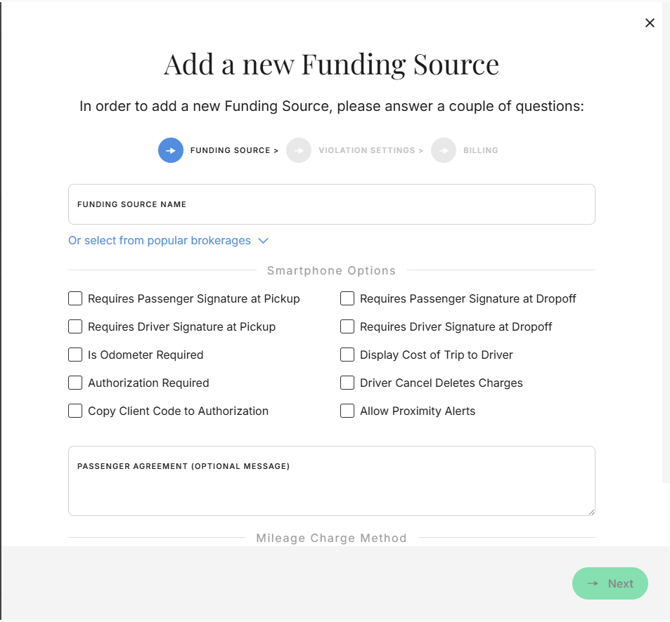
Step 3: Configure Mileage Charge Calculation
The Mileage Charge Calculation Method determines how per-mile charges are calculated for trips under this funding source.
Choose one of the following:
-
-
Routed – MediRoutes calculates mileage automatically using Bing Maps routing.
-
Imported – Mileage is pulled in from a broker file, trip import, or API.
-
Step 4: Signature Requirements
Passenger Signature
Use this section to require a passenger signature at:
-
Pickup
-
Drop-off
-
Both pickup and drop-off
When enabled, the Driver Mobile App will require a signature before the driver can continue.
Driver Signature (Per Trip)
Enable this option if a driver signature is required for each trip.
Note: This applies to the entire trip, not pull-out or pull-in signatures.
Step 5: Odometer Settings
Enable Odometer per Trip if drivers are required to record odometer readings for each trip.
Step 6: Violation Set
Click Next to move to the Violation Set section.
-
Select Set as Default for now
(These settings can be updated later if needed.)
Step 7: Billing Items (Rates)
Click Next to move to Billing Items (Rates).
- You may skip this step for now and add billing items and rates later.
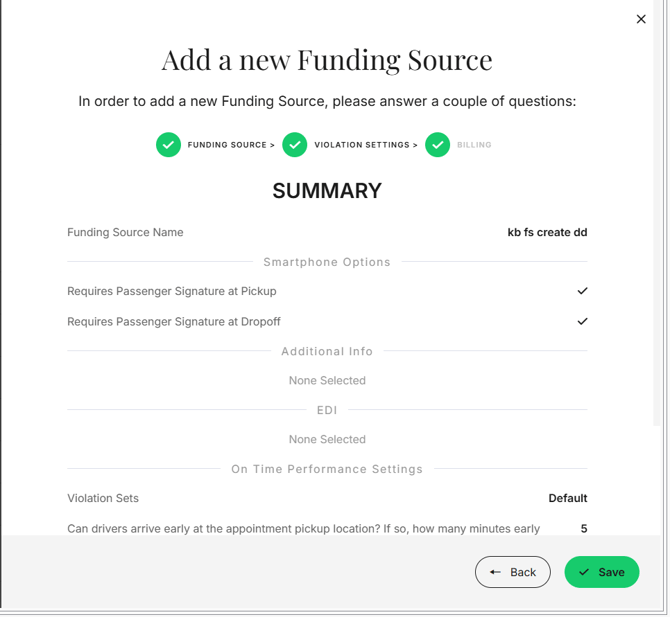
Step 8: Review and Save
-
Click Next to review the Summary
-
Confirm all settings are correct
-
Click Save
Your funding source is now created.