![MicrosoftTeams-image6f6e78ac5251452f5e9d5419521926001b2457277276701c3aff0c935893efe05f359183e579e81145254f68fa804b37b1631dcaf07986d136aeb8e94ed62bd3.png]](https://support.mediroutes.com/hs-fs/hubfs/MicrosoftTeams-image6f6e78ac5251452f5e9d5419521926001b2457277276701c3aff0c935893efe05f359183e579e81145254f68fa804b37b1631dcaf07986d136aeb8e94ed62bd3.png?height=50&name=MicrosoftTeams-image6f6e78ac5251452f5e9d5419521926001b2457277276701c3aff0c935893efe05f359183e579e81145254f68fa804b37b1631dcaf07986d136aeb8e94ed62bd3.png)
To shop a trip, first go to the Schedule Screen (A), and ensure you are working with the correct date (B).
The list of trips at the bottom of the screen would be the unscheduled trips for that date. You can use the magnifying glass icon (C) to shop the trip. You can use the white page with the red arrow (D) to force the trip onto the current run without reordering, or the two green arrows (E) to force the trip onto the current while also reordering.
Shopping a Trip
The Shopping screen will show all of your Routes for the day at the bottom of the screen and at the top of the screen will show a preview of what the Route will look like if you assign the trip. At the bottom of the screen, the shopping tool is showing you relevant information to help you to make a decision as to which route you want to place the trip on.
Run - The name of the route/run. By clicking on the run name, the preview at the top of the screen will change and you can view what the trip will look like on that run.
Prev Dist - The distance of the route before the trip is added. A distance of 0 indicates no trips are currently assigned.
New Dist - The distance of the route after the trip is added.
Dist Diff - The difference between distance of the route before and after the trip is added. This is essentially how many total miles you are adding to your scheduling by assigning the trip to the route.
Dist PU - The distance that the route must drive to get to the pickup location of the trip.
Please note that generally speaking, trips you shop earlier in the day should be more focused on limiting Dist PU, while shopping trips later in the day you should be more concerned with the Dist Diff.
Sch Late - How late the route will be, in total, after the trip is assigned
Sch Early - How earlier the route will be, in total, after the trip is assigned. This field is also use to indicated how much earlier your run will need to be in order to be on time for the pickup of the trip, in the event that we are shopping the first trip of the day.
Capacity Violation - A red box here indicates that a capacity violation will take place if the trip is shopped to this route. A capacity violation indicates that the vehicle we are using for that route cannot accommodate the space type of the trip (for example, attempting to shop a wheelchair trip to an ambulatory vehicle).
OBT Violation - A yellow box here indicates that an on board violation will take place, where the customer will be on board the vehicle for longer than the systems violation settings allow.
Once you determine where you want a trip to be placed, you would assign the trip by clicking on the green checkmark icon (A). If you want to back out of the shopper without assigning the trip, you can press the Cancel Button (B).

Force Scheduling
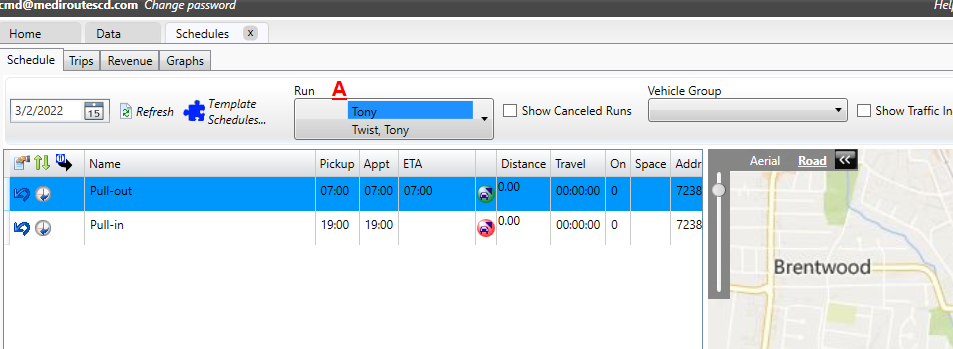
To force schedule, you need to have a run selected by using the drop down menu at the top (A). From there, just click on the force icon and the trip you are forcing will be placed on the run you selected.
Reordering Event Sequence and Forcing a Trip to a Run and Reordering Run Event Sequence.
There are two ways to access the Run Reorder Screen. You can either click on the Double Green Arrows Icon located in the upper left corner of the Schedule/Dispatch Run view, or you can click on the Double Green Arrows Icon next to a Trip, which is called Force with a Move Option. Both options will take you to the same screen, with the Force with a Move option allowing you to add the Trip you are Forcing onto the Run..
Reordering Run Trip Event Sequence
- Click on Double Green Arrows in upper left of the Schedule/Dispatch Run view.


- Once you click the Double Green Arrows the Run Reorder screen will show up.

- Follow instruction in next section on how to Move the Run trips event sequence order.
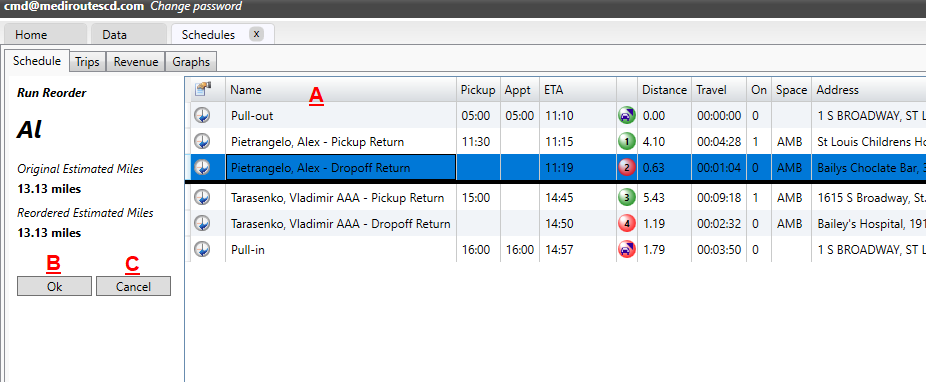
Run Reordering with Force with a Move option, and Moving Trip Event Sequence Order.
This works the same as forcing a trip with No move option, except that you will be directed to a new screen where you are given the option to reorder your events on the route before saving.
To reorder the events, double click and drag on the event names (A). As you are dragging the event, you will see a black line show. Wherever you place that black line, your event will be placed in the middle of the two events indicated.
Press OK(B) to save the trip assignment and reordering, or press Cancel (C) to cancel both the trip assignment and reordering.