Timekeeping Reporting
A guide on running and understanding the timekeeping report on mediroutes.com.
Once your drivers have started using the MediRoutes Mobile app and have started collecting timekeeping data, you will be able to access and edit timekeeping data within MediRoutes.com. This article will walk you through running the timekeeping report, show you how to export your data, and show you how to edit that data when it is inaccurate.
Running a Timekeeping Report
Start by navigating to the reports tab from the menu on the left. There you will click on the box that says, "Time Keeping Reports".

A - Select a date range by selecting a start date and end date.
B - (Optional) You can filter the list by vehicle group.
C - By default, the report selects all employees, however you can filter the report for only selected employees.
When you are done filling out the date and filters, click the green Run Report button on the right.

Timekeeping Report Results
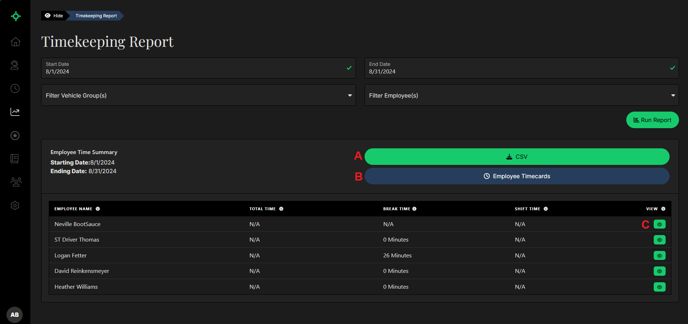
A - CSV will download a csv file of the full report to your computer. From there you can save it to your computer and print it if needed.
B - Employee Timecards will take you to the Employee Timecards page, which breaks down each of the drivers shifts for the selected time period.
C - The View button (the little green eye on each line) will take you to the Employee Details page, which shows each of the employees' individual shifts and allows you to update shift times.

Employee Timecards
A - Use Expand All to Expand the Employee Timecard Summaries and show the individual shifts for the drivers.
B - Hours & Minutes or Decimal Hours will control how the shift times are displayed. Depending on preference, you can click on one or the other.
C - CSV will download a file of each employee's shifts.
D - You can see the date range for your report here. Your report should show all shifts for whatever employees you selected from the Timekeeping Report screen, between the date range indicated.
E - This is a summary of the individual employee. If you see that they have a total time of 'N/A' this indicates that the driver has a missing time, and you would need to set the driver's Finish Shift time within the View Details page. For more information on correcting timekeeping errors, view the section below, Shift Details and Timekeeping Errors.
F - This section shows you each shift for the employee within your selected date range.
G - The View Details button will take you to the Employee Details page, which shows each of the employees' individual shifts and allows you to update shift times.

Employee Details
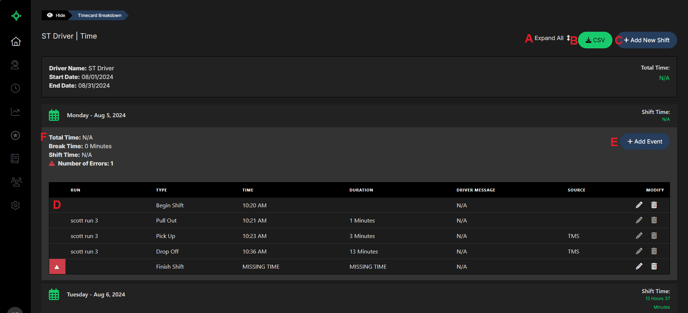
A - Use Expand All to Expand the Employee Details and show the individual timekeeping events for the date.
B - CSV will download a csv file of the employee's shifts for the time period.
C - Add New Shift allows you to add a shift for the employee you are viewing if one was missed.
D - Each of the employee's events and the times they were performed are displayed in the grid for each date. You can modify the times as needed using the pencil icon on the right-hand side of each line. You can also delete a time with the trash can icon.
E - Add event allows you to add an additional Break or Start/End Shift event on the run for that date.
F - A summary of the Time for the day is listed here. If the total time says 'N/A', that will change to the correct value once any missing times are added.

Shift Details and Correcting Timekeeping Errors
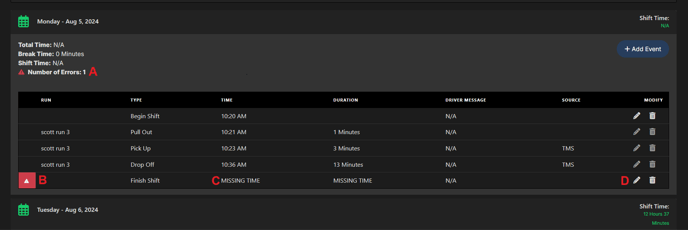
A - If there are errors within an employee's timecard, it will be indicated here on the Employee Details page.
B - The location of the error on the timecard is indicated here,
C - For this example, the Finish Shift event is missing a time value.
D - To correct this, use the pencil icon to edit this event and enter the time this shift should be ended. Shift Time and Total Time will be corrected to reflect their actual values once all errors are corrected in the shift events.

Revised Date: 9/5/24 ARB
![MicrosoftTeams-image6f6e78ac5251452f5e9d5419521926001b2457277276701c3aff0c935893efe05f359183e579e81145254f68fa804b37b1631dcaf07986d136aeb8e94ed62bd3.png]](https://support.mediroutes.com/hs-fs/hubfs/MicrosoftTeams-image6f6e78ac5251452f5e9d5419521926001b2457277276701c3aff0c935893efe05f359183e579e81145254f68fa804b37b1631dcaf07986d136aeb8e94ed62bd3.png?height=50&name=MicrosoftTeams-image6f6e78ac5251452f5e9d5419521926001b2457277276701c3aff0c935893efe05f359183e579e81145254f68fa804b37b1631dcaf07986d136aeb8e94ed62bd3.png)