![MicrosoftTeams-image6f6e78ac5251452f5e9d5419521926001b2457277276701c3aff0c935893efe05f359183e579e81145254f68fa804b37b1631dcaf07986d136aeb8e94ed62bd3.png]](https://support.mediroutes.com/hs-fs/hubfs/MicrosoftTeams-image6f6e78ac5251452f5e9d5419521926001b2457277276701c3aff0c935893efe05f359183e579e81145254f68fa804b37b1631dcaf07986d136aeb8e94ed62bd3.png?height=50&name=MicrosoftTeams-image6f6e78ac5251452f5e9d5419521926001b2457277276701c3aff0c935893efe05f359183e579e81145254f68fa804b37b1631dcaf07986d136aeb8e94ed62bd3.png)
Setting Up Bucket Rates:
A Bucket Rate is a rate sheet that groups mileage rates into different categories based on the trip miles. Each level of service has a set rate based on the number of miles traveled. Essentially, it combines Per Unit rates and Per Mile rates to calculate the appropriate charge.

Note: The above rates are shown just as an example and are not intended to represent typical or suggested rates for Transportation Providers.
Step One:
Please review linked the article below to get the basic steps to navigate to your Funding Source and add Billing Items. The next steps in this article will begin in the Funding Source Billing Item window.
Step Two:
Once you have the basics for setting up Billing Items, it is time to use the Optional Values Section on Adding New Billing Items for Bucket Rates.
- The Billing Item must be a Per Mile rate format, because you are adding this rate based on the trip Mileage (0-to-3-mile trips, 4-to-6-mile trips, and so on).
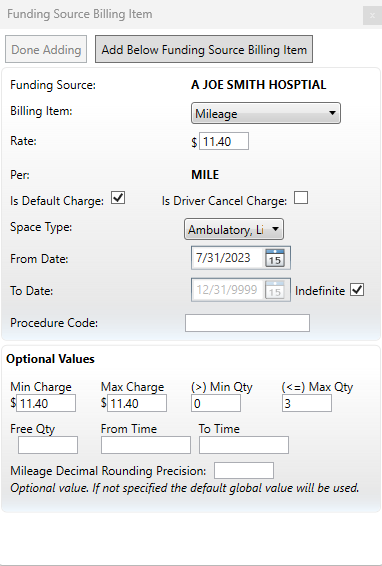
- Once you have a Per Mile billing item selected, then the Rate will be the dollar amount on rate sheet. For example, based on the above rate sheet, $11.40 for the Ambulatory 0-to-3-mile category.
- Make it a Default Charge using the checkbox and pick the Space Type for the respective Level of Service on the rate sheet.
- In the Optional Values section at the bottom, the Max/Min Charge values should be set to match the Rate. For example, if the Rate is $11.40 for 0 to 3 miles, then the Min Charge and Max charge both need to be set to $11.40. This ensures that the Per Mile Rate will not be lower or higher than the specified Rate amount for that bucket.
- The Min/Max Qty refers to the range of miles assigned to each bucket. For example, the first bucket on the rate sheet above for Ambulatory trips is for 0 to 3 miles. This means that any trip within the range of 0 to 3 miles will be charged according to this rate. In this case, for this first bucket, the Min Qty would be set to 0 and the Max Qty set to 3.
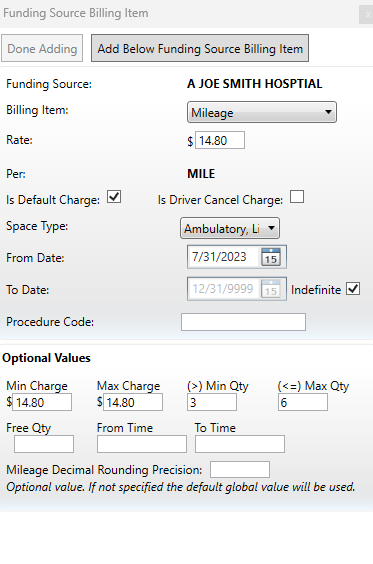
Min/Max Qty values are determined based on the conditions of Greater Than (>) and Less Than or Equal to (=<), as pictured above. The Min Qty will always be set to 0 for the smallest bucket, but for the other buckets, it will always be one less than the starting mile of the next bucket. For example, the 4-to-6-mile bucket needs to have a Min Qty of 3 so that the rate starts at any mile greater than 3 (i.e., 4). The Max Qty can always be set to the highest number in the given bucket range except for the highest bucket. For example, 0 to 3 miles would have a Max Qty of 3 and 4 to 6 miles would have a Max Qty of 6, but the 7 to 10 mile bucket needs to apply to any trip over 7 miles. For that reason, the highest bucket will not have a Max Qty set.
- To create the next rate bucket, refer to the example and set the Min Qty to 3 and the Max Qty to 6. Continue this process for each bucket, referencing the explanation above and following the specified bucket ranges. The typical rate sheet structure includes categories such as 0 to 3 miles, 4 to 6 miles, and 7 miles and above.
- The last bucket, which applies to trips that are 7 miles or longer, does not have a Max Qty value. This means that the fixed rate for trips of 7 miles or more will be added. Any trip above 10 miles will have a new rate applied per mile.

Step Three:
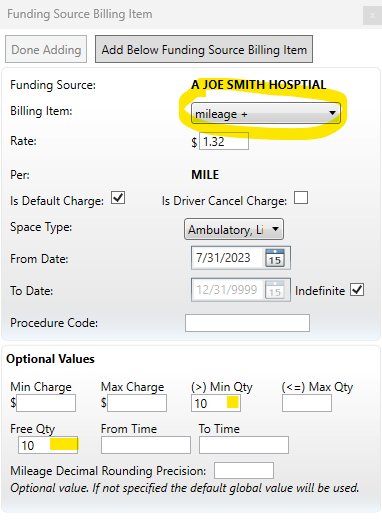
After completing the last bucket for each Space Type/Level of Service, the next step is to add a Billing Item for the Per Mile Rate that applies to trips over 10 miles in distance. There will be one for each Level of Service on the rate sheet. It is important to note that this Billing Item needs to be different from the one used for the buckets. In this case, you cannot use "Mileage" as the billing item, as previously pictured. Instead, we recommend using one called "Mileage +".
- To create the rate, follow the standard process, but use the Min Qty value of 10 to indicate that the rate only applies to any trip above 10 miles. This rate will be applied for trips starting at 11 miles and beyond. The Free Qty is used to prevent the rate from counting the first 10 miles in the charge. For example, an 11-mile trip would have a Quantity value of 1 on this Mileage + rate.
Step Four:
Once done with all rates, click Done Adding at the top of the window, and follow the steps to Update Trip Charges on existing trips in the system. These steps can be found in the article linked in Step One, but it is linked again below for your convenience. Update Trip charges will be the last step on the article.
How to Add Billing Items/Rate to a Funding Source.
Revised Date: 9/13/24