![MicrosoftTeams-image6f6e78ac5251452f5e9d5419521926001b2457277276701c3aff0c935893efe05f359183e579e81145254f68fa804b37b1631dcaf07986d136aeb8e94ed62bd3.png]](https://support.mediroutes.com/hs-fs/hubfs/MicrosoftTeams-image6f6e78ac5251452f5e9d5419521926001b2457277276701c3aff0c935893efe05f359183e579e81145254f68fa804b37b1631dcaf07986d136aeb8e94ed62bd3.png?height=50&name=MicrosoftTeams-image6f6e78ac5251452f5e9d5419521926001b2457277276701c3aff0c935893efe05f359183e579e81145254f68fa804b37b1631dcaf07986d136aeb8e94ed62bd3.png)
Funding Source Billing Items are what we call your Rates in the MediRoutes Desktop application. This guide will help you to add your Rates to your Funding Sources so that the trip charges are calculated on all trips under that funding source.
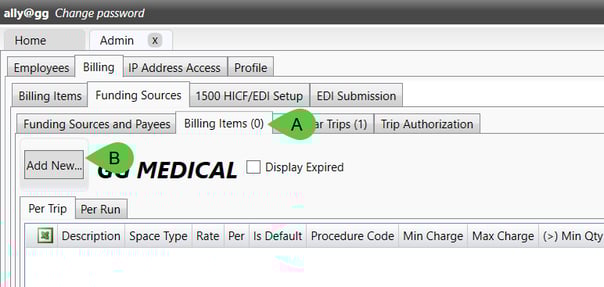
Step 1 - Navigating to Funding Source Billing Items
A - Click on the Admin link.
B - Click on the Billing tab.
C - Click on the Funding Sources tab.*
*Once at this screen, highlight the Funding Source that you will be creating Billing Items for by clicking on it.
D - Click on the Billing Items tab.

Step 2: Creating the Funding Source Billing Item
A - The number on the tab indicates how many Funding Source Billing Items (Rates) are setup under the selected Funding Source.
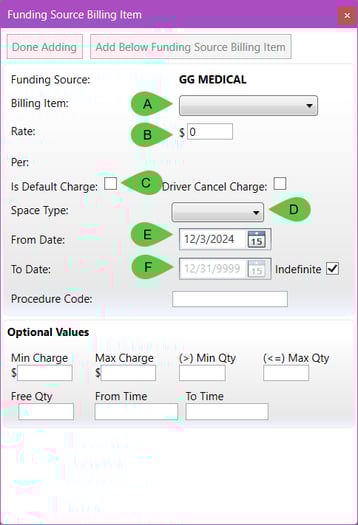
B - Click on Add New to create a new Funding Source Billing Item.
Step 3 - Configuring Your Billing Items
A - Select the Billing Item to be created from the drop-down menu. (Base, Mileage, etc.)
B - Enter the Rate/Dollar Amount for the Funding Source Billing Item.
C - Check the box if the charge should be a Default Charge*.
* A default charge is one that is automatically applied when the trip is created. Most base and mileage charges should be set as a default charge, while most service charges (Wait Time, Oxygen, etc.) would not be default.
D - Select the Space Type that the Billing Item will apply to. (Ambulatory, Wheelchair, etc.)
E - Enter the date the Funding Source Billing Item is effective from.*
*Make sure the From Date is earlier than when the trip charge needs to be effective. Take extra care if the billing item needs to be applied to past trips. This will default to the current date.
F - Optional: Enter the date the Funding Source Billing Item is effective to. Unless there is a defined end date to the rate, this should be left as Indefinite.
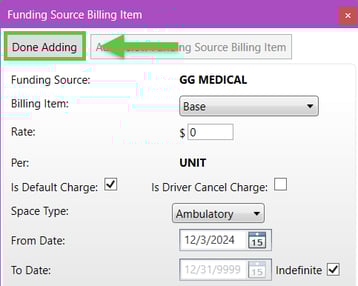
Step 4 - Adding the Billing Item
A - If the Funding Source Billing Item requires additional configuration (After Hours rates that use the time options, included miles, mileage buckets, etc.), review the Optional Values section at the end of this article and update these fields as needed.
B - Click on Add Below Funding Source Billing Item. If unable to click, review all previous steps and verify the Billing Item, Dates, Space Type, or Rate fields are populated.

Step 5 - Configure Any Additional Billing Items for the Funding Source
Once the Add Below Funding Source Billing Item button is showing as grayed out and the rate has been set back to $0, return to Step 3 to add additional billing items for the funding source. If no additional billing items are needed, continue to Step 6.
Step 6 - Return to the List of Funding Source Billing Items
Click on Done Adding to return to the list of Funding Source Billing Items and review them for any mistakes.
Optional Configuration Items
During Step 3, there are several other configuration items that can be used when creating Funding Source Billing Items. These are optional settings and should only be selected if they are needed to match your rate sheet requirements. Read the description for each optional setting carefully to determine if it applies.
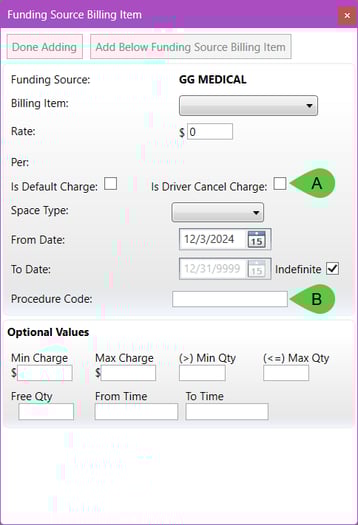
A - Check the box Is Driver Cancel Charge*.
*This option is used if the charge would only be applied to Dry Runs (Passenger No Shows).
B - Enter the Procedure Code*. If a modifier is needed, use a space to separate the modifier, i.e. "A0100 U2"
*These are sometimes used for medical billing but are not always provided or required.
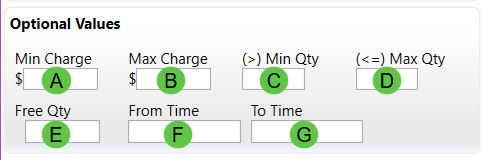
Optional Values
Just like the other options listed above, these optional values should only be applied per your rate sheet. The following values can be used for things like mileage buckets, mileage rates that only apply after a certain number of miles or setting minimum or maximum dollar amounts.
A - Enter the minimum amount that can be charged in total for the Billing Item in Min Charge*.
B - Enter the maximum amount that can be charged in total the Billing Item in Max Charge*.
*The Min Charge and Max Charge amounts will cap the charge of the trip, regardless of how many units or miles are in the trip. There is no need to enter this if your charge has no cap.
C - Enter the minimum number of miles needed before this charge would be applied in Min Qty*.
D - Enter the maximum number of miles needed before this charge would be applied in Max Qty*.
E - Enter the number of miles that would not be charged for in Free Qty*.
*The Min Qty, Max Qty, and Free Qty should only be used for Mileage based charges. These are known to be used in ModivCare Bucket Rates. See the article below for further help on the Bucket Rate structure and setup.
F - Enter the start time of when this charge would apply in From Time*.
G - Enter the end time of when this charge would apply in To Time*.
*From Time and To Time are typically used when defining After Hours Rates. MediRoutes is on a 24-hour time day, 12:00 a.m. to 11:59 p.m. From and To times will be used based on a single day and require using 2 Billing Items. For example, 7:00 p.m.-7:00 a.m. after hours rates will need to be split up between 7:00 p.m. to 11:58 p.m., and 12:00 a.m. to 7:00 a.m. (one rate for the p.m. hours, one rate for the a.m. hours). Setting one Billing Item From 7:00 p.m. To 7:00 a.m. won't work.
Update Trip Charges
If you are needing to backdate rates on past trips or have just added updated rates on an existing Funding Source, please click the article link below and proceed to Step 5.
How to Update Your Rates
Revised Date: 12/3/24 ARB