![MicrosoftTeams-image6f6e78ac5251452f5e9d5419521926001b2457277276701c3aff0c935893efe05f359183e579e81145254f68fa804b37b1631dcaf07986d136aeb8e94ed62bd3.png]](https://support.mediroutes.com/hs-fs/hubfs/MicrosoftTeams-image6f6e78ac5251452f5e9d5419521926001b2457277276701c3aff0c935893efe05f359183e579e81145254f68fa804b37b1631dcaf07986d136aeb8e94ed62bd3.png?height=50&name=MicrosoftTeams-image6f6e78ac5251452f5e9d5419521926001b2457277276701c3aff0c935893efe05f359183e579e81145254f68fa804b37b1631dcaf07986d136aeb8e94ed62bd3.png)
Creating A New Trip
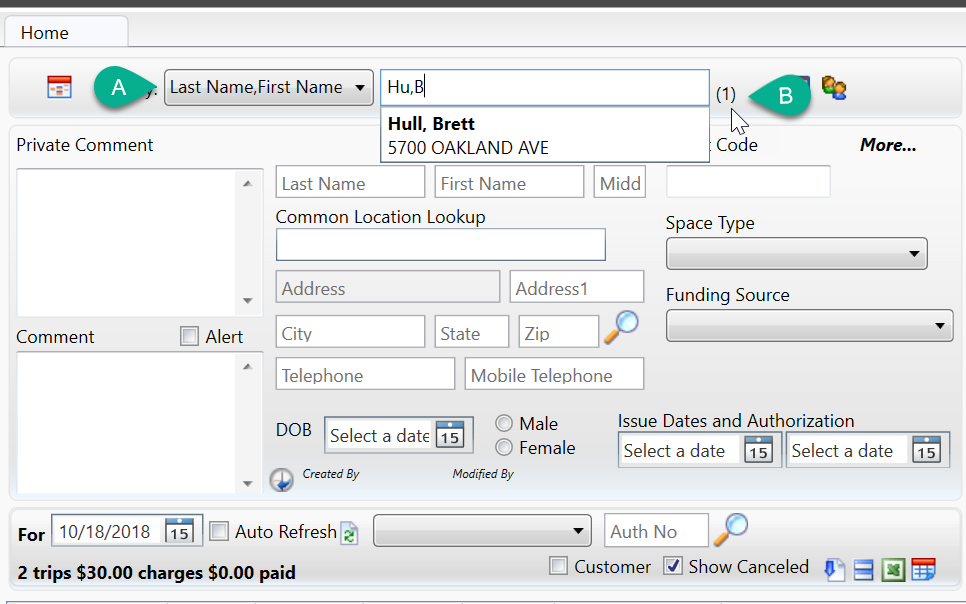
Step 1- Find the Customer
A – Use the search field to find the customer.
B- If a number in parenthesis appears on the right side of the search field, it means you have found a match. Use the Down Arrow key on your keyboard to drop down the list of matches. Click on the Customers Name that you want to create the trip for.
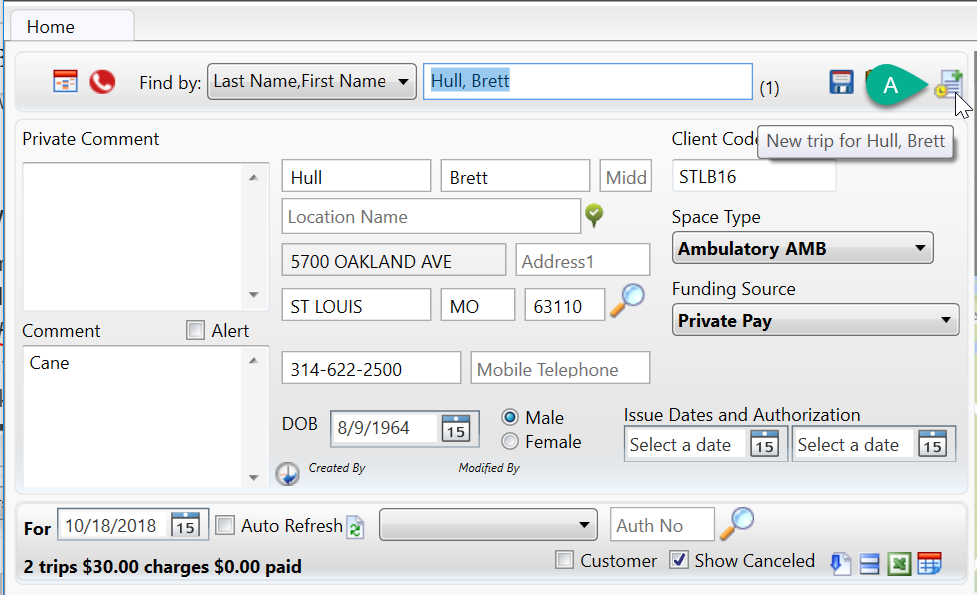
Step 2 – Create New Trip
A - Click on the New Trip icon
Several panels will unfold, and the main window where you enter trip information will display with a green background.
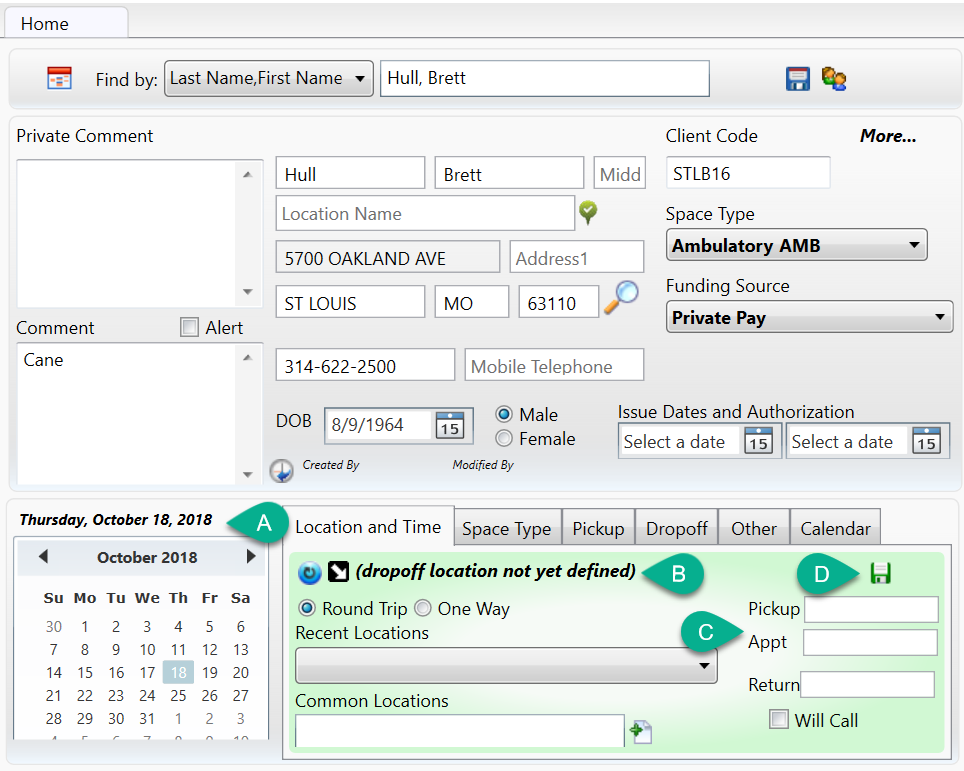
Step 3 – Enter Required Trip Information and Save Trip
A - Select the service date of the trip
B - Enter drop-off address for trip. Select 'One Way' if trip is not a round trip (A round trip will create another trip, returning customer to their home after appointment).
See section below on entering an address for more information on working with addresses.
C - Enter the appointment time
Once you leave the Appointment Time, the pickup time and return time will calculate automatically. See section below on times for more information.
D - Click Save to save the trip.
Working with Addresses
By default, MediRoutes will take the customers home address and copy it into the pickup address. If you want to change the pickup address, click on the icon that looks like a black box with a white arrow. The white arrow up indicates a pickup address while the white arrow down is the drop-off.
You can enter an address by looking at the list of recent locations and selecting one.
You can also search for an address stored as a common location, using the common location search.
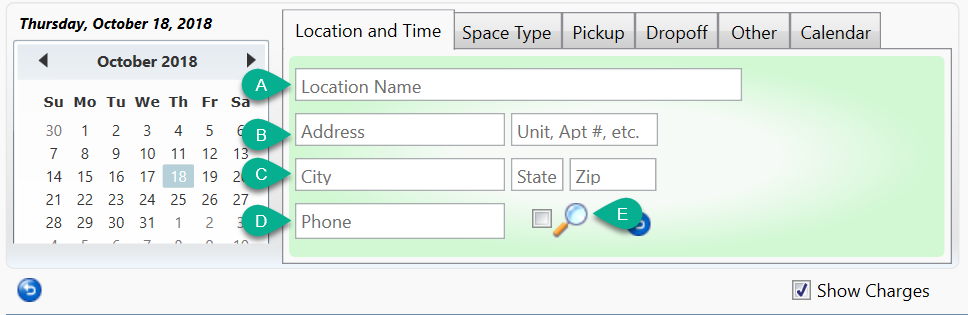
If the address has never been entered in the system, you will need to create it manually, by clicking on the black text that says, '(drop-off location not yet defined)'. Enter the following information.
A - Location Name
If a name is entered for the location, it will be saved as a "common location" once the trip is saved.
B - Address / Address 1
Address for Main Street Address and Address 1 for Apt or Suite Numbers
C - City, State, Zip
Only City and State or the Zip need to be entered for you to be able to find the address.
D - Phone (Optional)
Phone number associated with the location.
E - Find Address
Click this button once all address information is entered. The system will geocode the location. Once completed, click the green check icon to save the location.
Entering Times
Always enter the appointment time first. When you enter an appointment time, the system will calculate a pickup and return time. If you want to specify a different pickup or return time, you can do so. If you try and enter a pickup or return time before the appointment time is entered, the system will recalculate your pickup and return times once the appointment time is entered.
If you specify a one way trip, you will be prompted to enter either an Appt Trip or a Return Trip. An appointment trip will require both an "appointment time" and a "pickup time," while a Return trip only requires a time for the customer to be picked up which will be entered in the "Return" box.
If there is no "Return" time for the trip because the customer will call when they are ready to be picked up, check the "Will Call" box. This will automatically set the "Return" time to 11:59pm. To learn more about "Will Call" return trips and how to Schedule them, click here.
Save Trip
Once all of the information for the trip is entered, click on the green floppy disk in the top right-hand corner of the green trip information box.
Optional Trip Information
Space Type
The space type of a customer can be changed from the space type tab. From here, you can also update the number of additional passengers with their space types.
Pickup/Dropoff Comments
Pickup and Dropoff Comments can be added by going to the pickup or dropoff tab.
Other
The other tab can be used to define the caller of the trip, an authorization number for the trip, or can be used to define other custom fields (see related link below for setting 'Other' and 'Other 1' fields).